|
|
|
FOSSIL PREPARATION |
|
|
Freeze-frame animation of the preparation
(x1.0)
(May run slowly when first loading)
There are a great many preparation techniques which can be employed to prepare a chalk fossil to a high standard. The choice of techniques largely depends upon the type of fossil, the nature of the chalk, and the condition which the fossil is found in. The following case study documents the preparation of a chalk fish, sourced from an old collection and recorded as Hoplopteryx lewesiensis from the Senonian (Coniacian-Campanian) of Lewes, Sussex. The objectives of the preparation are to:
Expose the undamaged surface of the specimen
Confirm the identity
Constrain the source horizon
Constrain the locality
Chalk fish are extremely scarce fossils and are typically very fragile, so any articulated material in any condition warrants a careful and well thought out preparation. The collector is most likely to encounter chalk fish in museum collections, and dealers will typically acquire specimens from old collections - such old collections are typically very poorly provenanced, so any information on horizon or locality which can be gleaned during preparation is of value. The chalk downland around Lewes is heavily quarried with at least slightly differing sections of the chalk exposed in each. An analysis of fossils associated with the chalk fish might indicate the level which it was sourced from and hence which of the quarries.
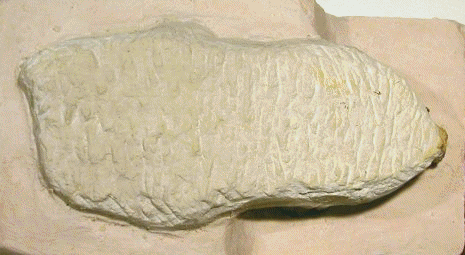
1). Prior to reversal preparation: The specimen is initially in a very poor state of preparation. The exposed surface - skull and trunk - of the fish, seems to be essentially as found. The bones of the skull are broken away, making a confident identification near impossible. The scales of the exposed surface are entirely lost, those exposed being from the reverse side of the fish and hence viewed on the inner surface, further complicating an identification. The vertebrae are largely broken through the centre and most of the ribs are lost. The margin of the fish and its fins are entirely lost. However, the state of preservation indicates that the unexposed surface currently embedded in the matrix will be near intact. The objective of the preparation will therefore be to reverse the specimen and prepare it from the other side, exposing the undamaged and complete surface of the specimen. The exposed surface will be strengthened, then set in plaster, before being prepared from the reverse surface. Matrix removed during the preparation will be subjected to a micropalaeontological (fossil plankton) analysis which will indicate the age of the specimen and which of the Lewes quarries it may have been collected from.

2). Recording details of the exposed surface: The reversal process will hide the initially exposed surface irreversibly, so a record must be made of any significant features. In this case, a short well-preserved section of vertebral column is exposed behind the skull and a number of high resolution digital photos have been taken. Photos and sketches should be used to plan how the specimen will look once reversed and guide the preparation.
 A
A |
 B B |
3). Readying the exposed surface for reversal: The specimen is strengthened with super glue and super glue gel prior to immersal in plaster and reversal. The skull will be well supported by a backing of matrix once reversed (the chalk which infills the skull cavity), but the scales of the flank will have no backing other than the glue and must be especially strengthened. Fragments of matrix are glued to the back of the most vulnerable scales. Small, angular blocks of matrix glued to the exposed surface will cause the plaster to set more securely to the specimen. The matrix enclosing the unexposed surface is trimmed (with caution) at this stage. Caution - Avoid inhalation of fumes where large amounts of super glue are being applied; Apply in a well ventilated setting.
 A
A |
 B B |
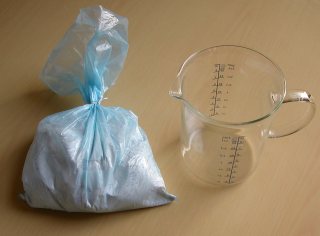
4). Preparation for applying the plaster: Before the plaster is applied some careful thought is given to the extent that the exposed surface will be covered. A small trench is etched around the glued surface, to the mark the point to which the specimen should be immersed in the plaster. The top of the skull is a diagnostic feature which should be left exposed, so the skull end of the fish will be immersed less than the flank. Plaster of Paris is the plaster of choice. The weight of water and plaster are measured to produce plaster with the correct strength and rigidity when dry - around 7.5 parts water to 10 parts plaster. For more information, visit www.ceramics.com. Sudden immersion in a wet medium can cause chalk to shatter as the air is driven out of the microscopic pores and fractures, so the specimen is placed in a damp environment - on a wet tissue - for 24 hours prior to immersion in plaster. As the plaster dries it will generate heat and contract, so the fossil is assessed for its likelihood to survive the process.

5). Applying the plaster: The specimen is placed in a suitably sized plastic tray, exposed-side down, and the plaster poured in. The plaster is quickly shaped as it dries, to follow the trench etched around the glued surface and to leave the roof and snout of the skull uncovered. As it begins to harden, the surface of the plaster is smoothed. This is left to dry for 24 hours.
 A
A |
 B B |
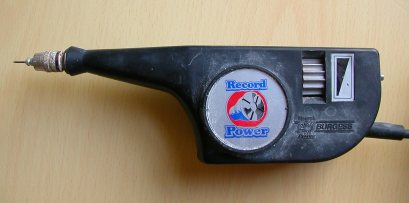
6). Preparing the reverse side: This stage is the most lengthy and requires around 12 hours of careful preparation work. The bulk of the matrix is trimmed down using a hobbyists engraver (6A), though other percussion tools such as a pneumatic air scribe are equally if not better suited. Power scissors (6B) can also be used with caution at this stage. The final 1 cm layer of matrix is removed by hand using a variety of probes and blades (6B) - the bones and scales of the fish are extremely fragile, often weaker than the chalk matrix, and must be exposed with extreme care. Caution - Percussion tools should be used for short (15 minute) intervals between which the hands and tools should be rested; Goggles should be worn to protect the eyes from fragments of matrix thrown loose during preparation.
 A
A |
 B B |
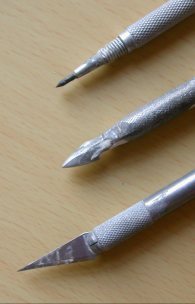
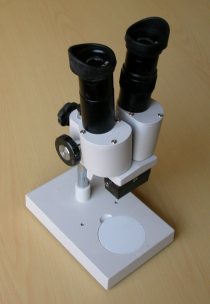
7). Suitable tool-tips for the mechanical exposure of the chalk fish are sharply conical points; harpoon-like blades; regular craft-knife blades (7A). The most detailed preparation work, especially exposure of the scales, is carried out under a microscope (7B).

8). A fragment of inoceramid bivalve is recovered from the matrix - these can be diagnostic of certain horizons in the chalk. Samples of chalk matrix were collected and passed to nannoplankton specialist for a biostratigraphic dating of the specimen - nannoscopic fossils contained in the matrix indicate the age of the rock with relative precision - the specimen dates from the Santonian to Early Campanian, equivalent to the Newhaven Chalk Formation in Sussex. This is intriguing, as the chalk of the immediate Lewes district is older than Santonian, and all of the 'classic' Lewes chalk-pits can be dismissed as the source locality. Pits of this age did exist several miles south of Lewes, towards the coast behind Newhaven and it is perhaps from one of these that the specimen originated. 'Locality unknown' is the only accurate statement which can be made.

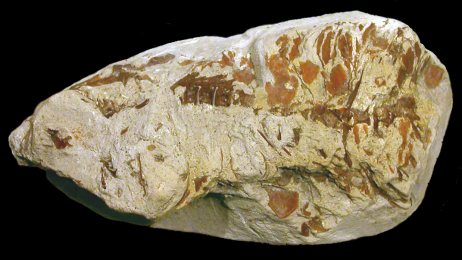
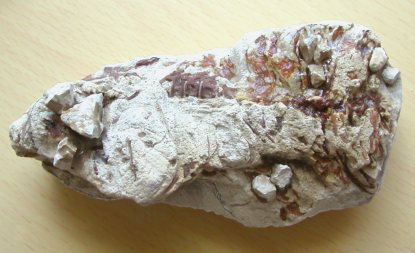
9). The completed preparation has exposed a well preserved, 3-dimensional skull and a reasonably well articulated flank of scales. The distinctive opercula bone (large gill-flap bone at the back of the skull) seems to confirm the identity as Hoplopteryx lewesiensis. The scale ornament is consistent with this identification. The primary reference source here is Woodward (1902-1912) [Woodward, A.S. 1902-1912. The Fossil Fishes of the English Chalk. Palaeontographical Society Monograph, London] which remains the key reference for this subject matter. Interestingly, Woodward (1902) gives the age range of H. lewesiensis as Cenomanian-Coniacian, older than the specimen described here - is this the youngest recorded specimen of H. lewesiensis?